
Installation of MongoDB
Download the latest production release of MongoDB from the
There are three builds of MongoDB for Windows:
MongoDB Steps
•
MongoDB for Windows Server 2008 R2 edition only runs on Windows Server
2008 R2,Windows 7 64-bit, and newer versions of Windows. This build
takes advantage of recent enhancements to the Windows Platform and
cannot operate on older versions of
Windows.
• MongoDB for Windows 64-bit runs on any 64-bit version of Windows newer than
Windows XP, including Windows Server 2008 R2 and Windows 7 64-bit.
• MongoDB for Windows 32-bit runs on any 32-bit version of Windows newer than
Windows XP. 32-bit versions of MongoDB are only intended for older systems and for use in testing and development systems.
Note:-
MongoDB Version 2.2: MongoDB does not support Windows XP.
Prefer recent version of Windows to use more recent releases of MongoDB.
Note:- Always download the correct version of MongoDB for your Windows system.
64-bit versions of MongoDB will not work with 32-bit Windows.
32-bit versions of MongoDB are suitable only for testing and evaluation purposes and only support databases smaller than 2GB.
You can find the architecture of your version of Windows platform using the following
command in the Command Prompt
runprompt>wmic os get osarchitecture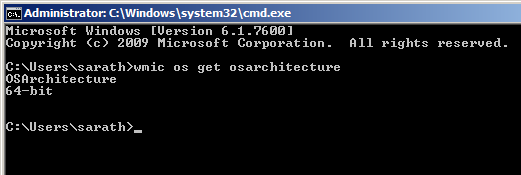
Extract the archive to C:\ by right clicking on the archive and selecting Extract All and browsing to C:\
Note: The folder name will be either:
C:\mongodb-win32-i386-[version] Or C:\mongodb-win32-x86_64-[version]
In both examples, replace [version] with the version of MongoDB downloaded.
Set up the Environment Start the Command Prompt by selecting the Start Menu,
then
All Programs, then Accessories, then right click Command Prompt,
and select Run as Administrator from the popup menu. In the Command
Prompt,
issue
the following commands:
cd \
move C:\mongodb-win32-* C:\mongodb
Note: MongoDB is self-contained and does not have any other system dependencies.
You can run MongoDB from any folder you choose. You may install MongoDB in any
directory (e.g. D:\test\mongodb)
MongoDB requires a data folder to store its files. The default location for the MongoDB data directory is C:\data\db.
Create this folder using the run prompt. Issue the following sequence:
md data
md data\db
Note: You may specify an alternate path for \data\db with the dbpath
setting for mongod.exe as in the following example:
C:\mongodb\bin\mongod.exe --dbpath d:\test\mongodb\data
If your path includes spaces, enclose the entire path in double quotations, for example:
C:\mongodb\bin\mongod.exe --dbpath "d:\test\mongo db data"
Start MongoDB
To start MongoDB, execute from the Command Prompt:
C:\mongodb\bin\mongod.exe
This will start the main MongoDB database process. The waiting for connections
message in the console output indicates that the mongod.exe process is running successfully.
Note:
Depending on the security level of your system, Windows will issue a
Security Alert dialog box about blocking "some features" of
C:\mongodb\bin\mongod.exe from communicating on networks.
All
users should select Private Networks, such as my home or work network
and click allow access.
For additional
information on security and MongoDB, please read the Security Practices and Management
Warning: Do not allow mongod.exe to be accessible to public networks
without
running in "Secure Mode" MongoDB is designed to be run in "trusted
environments" and the database does not enable authentication or "Secure
Mode" by default.
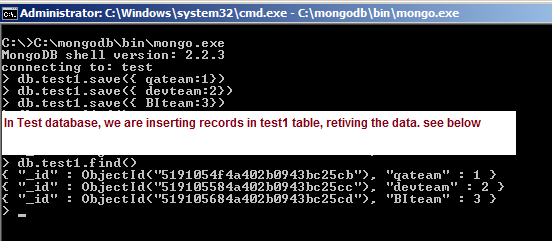
Connect to MongoDB using the mongo.exe shell. Open another Command Prompt and
issue the following command:
C:\mongodb\bin\mongo.exe
Note: Executing the command start C:\mongodb\bin\mongo.exe will automatically
start the mongo.exe shell in a separate Command Prompt window.
The mongo.exe shell will connect to mongod.exe running on the localhost
interface and port 27017 by default.
Connected test default database and inserting test records and retrieve the records.
> db.test1.save( { qateam: 1 } )
> db.test1.save( { devteam: 2 } )
> db.test1.save( { BIteam: 3 } )
> db.test1.find()
Installation and testing completed.
No comments:
Post a Comment